
7 Tips Everyone Should Know For Looking Fabulous In Any Photo!
- Sep 3, 2019
- 7 min read
Updated: Jul 26, 2022


Don’t you just hate it when someone wants to take a picture of you and you have no idea how to stand or what to do so that you look your best on the image?
Picture the scene: It’s a big family get-together and your Uncle Bob has volunteered to dust off his camera and be the event photographer. It’s you turn to pose next to the fountain. So you stand facing straight on, with a desperate questioning look on your face hoping the person taking the photo will guide you with how to pose. But all you hear is “say ‘cheeese!’”. You smile awkwardly, the shutter clicks.

You both look at the photo on the small LCD screen. Uncle Bob stays silent, not 100% happy with the photo but unable to pin point why the photo doesn’t look right. He is however praying you will not notice, but instead he's hoping you will jump for joy and be forever grateful. After all, thanks to the full Auto Mode on his camera, the photo is in focus and the exposure looks ok.
You’re not happy with the photo as you don’t feel you look your best, but you are also not sure how you could have posed better. So you just smile and say “That’s’ nice. Thanks Uncle Bob!”. Uncle Bob is jubilant and seriously considering switching his career to full time photographer.
The reality is that everyone has a camera these days, be it a cell phone or digital camera. Everyone is taking photos and sharing them on social media. A professional photographer will know how pose any body shape to emphasise the client’s assets and personal traits to make them look their best. But not everyone taking a photo of you will be a Pro photographer, therefore it’s up to you to work with what your Mama gave you and master what poses will work best for you.
So wouldn’t it be nice to feel comfortable that you know how to look fabulous when any camera lens suddenly points to you?
Here are 7 tips I always use and teach my clients at the beginning of their session. You want to be amazed by how simple and effective these tips are? Go and stand in front of a full length mirror to try them out as you go through them. Take note of the before and after look!
Tip #1: PULL THAT STRING UP & STAND SUPER TALL
This is the first tip I give all my clients: men, women and children. Imagine you are a marionette and have a string attached to the crown of your head. Now imagine someone pulling that string up. You always want to feel elongated and stand tall.


[Pic 1&3: Standing normally, slouched. Pic 2&4: Pulling the string elongates the neck, shoulders back, chest out]
This also applies when you are walking while the photographer or your friend is taking pictures. Walking and standing tall will look so much better than the normal slouch we are all guilty of doing from sitting in front of a computer all day.
Check the difference in the mirror: Take note how you look standing ‘normally’. Now pull that string up to stand tall and pull those shoulders back and down. Repeat standing at 45 degrees to the camera.
Tip #2: WHAT IS CLOSEST TO THE CAMERA WILL APPEAR BIGGER
Which means that whatever body part you want to draw attention to needs to be closest to the camera. Conversely, whatever body part you want to draw the eyes away from needs to be the furthest away from the lens.


[Pic1: Front hip forward Versus Pic2: Weight on back hip. See how much bigger the thigh in Pic 1 looks]
[Pic3: Emphasis is on the chest, legs and hips look small. Pic4: Hand looks disproportionately bigger ]
Tip #3: FOR WOMEN – DO THAT S-CURVE
Depending on how you’re going to be standing, your body will have a totally different shape. All your posing work is going to be on your legs.
Eg, if you stand just square on with your arms down, you look very neutral and shapeless:

The aim for women is to get the ‘S’ curve to look feminine. Check out photos of professional models; they will all have a beautiful s-curve and bends in their joints.


To create a feminine S-curve, you want to turn your body a bit to the side and put your weight on your back leg – that’s the leg furthest away from the camera. What this will also do is pull your hips and bum away from the camera, which will then make them appear smaller (refer to Tip 2).
The more you want to pose like a fashion model, the harder you’ll need to curve those curves and bend those joints [Pic2].
Try it in front of a mirror and see for yourself! Unless you’re Beyonce, you should always put your weight on the back leg… unless you want a big hip on the photo. And I’ve never had a client wanting THAT now that I think about it.
Tip #4: FOR MEN – SHOULDERS WIDE, STAND STRONG, BUSY HANDS
As a man, stand tall, chest out and shoulders back. You can face the camera straight on but do not slouch. Never stand with your hands just hanging by your side else it will just look weird.

You can put your hands in your pockets, or cross one arm and the other touch your chin, or hold one hand onto your jacket lapel, or look at your watch or anything except letting them hang loose by your side.


Tip #5: CHICKEN DOWN: EARS FORWARD AND CHIN DOWN
This one is always the most awkward and difficult to do for clients who have never had a professional photoshoot before. But this tip in super important if you want to minimise a double chin and emphasize your jaw line. I’m always talking and guiding my clients during a shoot and when I want them to do this move, I tell them “Chicken-Down for me”. This is how you do it:
Try this now in front of a mirror. Stand normal as you would normally do and take note of your jawline and neck. Now pull that head string up to elongate your neck (Tip #1), move your ears horizontally forward (like a chicken walking), and now drop your chin a little bit until you can see your jawline nicely highlighted. Can you see the difference?


[Pic1: Neutral head. Pic2: Move your ears horizontally forward. Pic3: Drop you chin a bit. ]


[Pic1: Before - see how much thicker the neck is, not great jawline. Pic2: Thin and elongated neck, defined jaw]
Remember, it is normal for the Chicken-Down to feel very uncomfortable. The more you practice, the quicker and more naturally you’ll do the pose when someone quickly wants to snap a photo of you.
Tip #6: CELLPHONE: CHECK THAT ANGLE
It’s not going to help having perfected your signature pose, and the person holding the camera is skewing the angle and completely distorting you.

The majority of people hold their phone at their own face height which means that even if they are the same height as you:
The distance between the camera lens and your head is shorter than the distance between the camera lens and your feet.
What does that mean?
So from what we have learned from Tip #2, your head will appear bigger and your legs will be shorter.
This will be made even worse if the phone is tilted down resulting in even greater body distortion.
The solution? (Especially if they are using your phone to take a photo of you): Ask them to bend or kneel down so that the camera lens is at your waist height. This way your body will be in proportion in the photo.

However, you can play with various distortion angle for fun! If the person taking the photo kneels down and tilts the phone up, you’ll end up with legs that go on forever!
Another secret: When taking photos with your fur-baby, make sure you kneel right down to their head level.

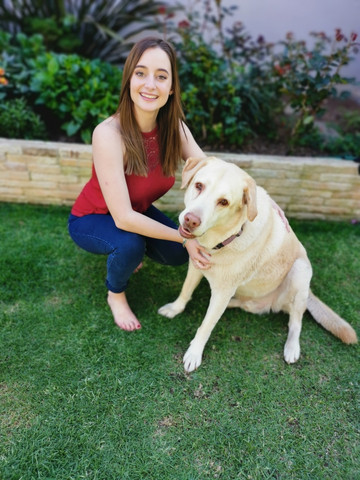


[Pic1: Photo taken standing up. Pic 2: Photographer knelled right down]
Tip #7: CUT OUT THE ‘CHEESE’ AND SMIZE!
Who actually came up the idea of getting your subject to say “Cheese” as a way to cajole a natural smile for a photo? When someone says “Cheese,” the mouth stretches unnaturally and it is not a flattering look for a photograph. The smile is fake and the joy is not reflected in the eyes.

When I want my client to smile, I usually have a few jokes up my sleeve that will make them genuinely laugh or smile and I’ll take the photos at the opportune moment. However, if you are just put on the spot and told to say ‘cheese’, rather do the following:
First, relax your forehead. Doing that will automatically relax your eyes too. Now relax your mouth. Now your eyes will have tightened again so relax them again and try to get your eyes to 'smile' (Smize), like trying to make them stretch out into a smile. You should immediately feel your forehead and your temples relax even more and this will also add a more genuine a warm look to the photo. Now you can smile.


Another super-secret trick I use is I make my clients close their eyes and ask them to think about someone they really miss and would love to see here next to me. Then on the count of 3 I tell them to open their eyes and show how happy they are to see them. That always does the trick, and I actually also use that for myself when I have to be in a photograph.
Unless you're in a Teen Drama, pouting is so last millenium! But if you don't want to smile and prefer to have the serious full lipped pose, then rather say "prune"... It's more gentle and natural approach ;-)
Extra Tip: HAVE FUN!
The above tips should be helpful for any type of photos you will be a part of. Whether is it a professional photoshoot, a family gathering, cellphone pics with friends, or even selfies!
I really believe that in order to produce great pictures, it is better to click with my client than to click with the shutter. It is important that you do connect with the person taking a photo of you as your feelings and mood will definitely transpose on the picture.
Imagine someone you are not fond of is taking a photo of you ,versus a loved one taking the shot. You can have the exact same pose in both images but they will both be very different. It’s all in the eyes and the story they tell.
So if you decide to have a photographer take photos of you, make sure you connect with him or her as it will make the experience so much more enjoyable and reflect in the photos.
So that’s it! These were just some really basic posing tips, and you should have definitely seen a difference if you have done them in front of a mirror. Now you need to practice and adjust them to suit your body and for the new fabulous signature look you want to be captured.


Comments